Quick Links
Monsters are nothing to laugh at in The Legend of Zelda: Tears of the Kingdom, but with the help of Lookout Landing's Monster-Control-Crew, you'll at least have some assistance in taking out these nuisances across Hyrule. With six Side Adventures to complete, you'll have your hands full with monsters and quest rewards in record time.
As each quest eventually offers 100 rupees each time and can be redone with every Blood Moon, completing these quests is a great way to farm rupees in a game where such resources are tricky to find. So find your squad leader, grab your weapons, and dedicate yourself to the endless crusade against the foul beasts of evil.
Bring Peace To Hyrule Field!

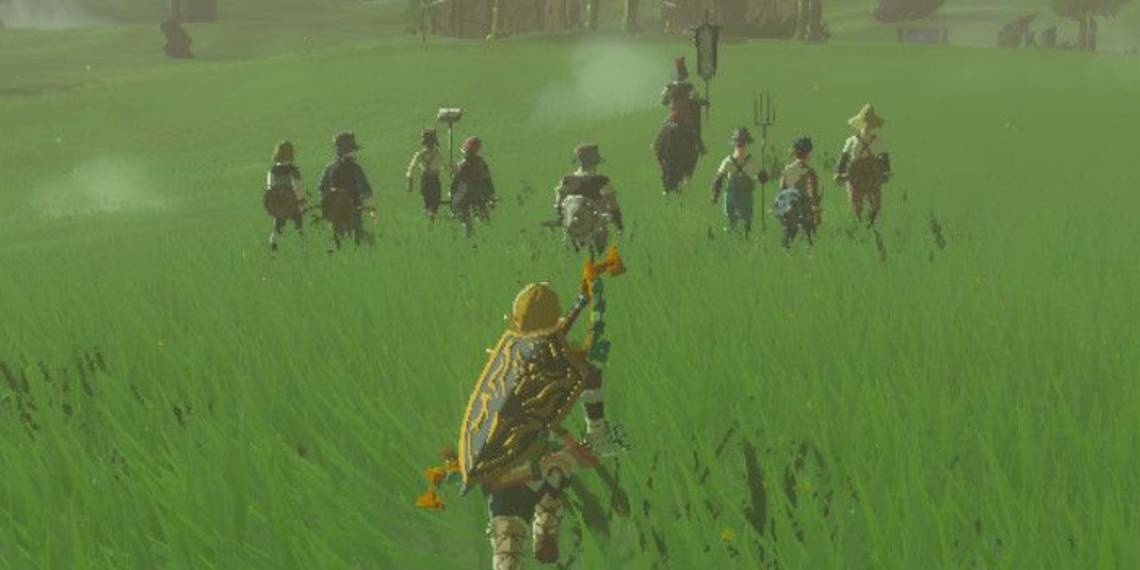
Southeast of the Hyrule Field Chasm and on your way to Hyrule Field Skyview Tower are a batch of ruins.
However, before you reach them, you should spy a small camp where you can speak with the cook for a free meal and, if you wish, a free weapon sitting in one of the tents.
These camps will be near each quest site, so seek them out on your way.

Hoz will be further down the road and in the grass upon his horse and surrounded by his squadron.
Talk to Hoz to initiate this quest, then charge into the enemy encampment. Defeat all the monsters, and Hoz will force dialogue with you to receive your reward.
He will also automatically trigger "Bring Peace to Necluda!" during his first instance, and each time after a blood moon, you must first defeat the monsters at this location before you can challenge Necluda.
If you ever need an update on the squadrons' locations, you can speak with Gralens in Lookout Landing's Emergency Shelter (standing at the table near the Hyrule map).
Bring Peace To Necluda!

After entering Necluda and passing through the Dueling Peaks, Hoz can be found again just west of Fort Hateno. Like the last time, speak with him on your approach to charge into the enemy monster camp with a force of soldiers.
After you defeat all monsters within the camp, Hoz will give you his gift, but he won't give you the next quest. From here on out, you'll be working with the commanders of the other squads. You have a choice between:
- Flaxel's Squadron - Faron Grasslands
- Toren's Squadron - Eldin Volcano
You can do these in any order.
Bring Peace To Faron!

Flaxel's squadron can be found in the Faron Grasslands just outside (on the east side by the map) of a large pirate ship infested with monsters. This ship is located on the Menoat River just south of the main road's bridge.
However, to start this quest, you'll need to fix the bridge leading to the monster base.

Directly in front of Flaxel's group is a broken bridge hanging down toward the water. Pick it up with Ultrahand and Attach it to Link's side to progress.
After you defeat all monsters, Hoz will give you a gift and a new quest to aid her squadron in Hebra.
Bring Peace To Hebra!

In the Tabantha Snowfields' southern province, you can find Flaxel approaching a fort southeast of Snowfield Stable. Speak with her to learn that there's a metal ball blocking their assault.
Sneak forward by any method of your choosing and move the spiked, metal ball out of the way (or out of the fort entirely) for Flaxel to interrupt with dialogue and then charge in.

Like with Hoz, she'll thank you and return to Lookout Landing until the next Blood Moon (when she'll respawn at the pirate ship).
Make sure to loot this fort after you finish, including lifting the cages up and off the resources inside. There are several valuable food and weapon items to loot here.
Bring Peace To Eldin!

In between the two lizard lakes north of Death Mountain in Eldin, you can find Toren marching his squad up to a cave known as the Lake Darman Monster Den.
You can use Sibajitak Shrine nearby as a teleportation point if you've already reached this area.
Otherwise, the easiest and fastest way to reach this place (without needing heat equipment or meals) is to leave from the East Akkala Stable and ride along the northern side of Hyrule until you cannot any longer; Kimiyat Shrine will be on your way.

Inside this den, there are several monsters that you'll need to defeat with Toren's squad's help. Additionally, once you mop up all the monsters, there are several ore deposits with Flint, Rock Salt, Amber, and Opal to mine here.
When you finish, Toren will give you the quest to join him in Akkala.
Bring Peace To Akkala!

At the large bridge near the Citadel Ruins (not far from South Akkala Stable and quickly accessible via either the nearby Sky Tower or Domizuin Shrine), Toren's squad will wait for you on the southern side.
The monsters here have horns to signal the attention of their comrades, and there's not much coverage here to protect. Keep alert and let the soldiers take the monsters' attention mostly.

Once they're all defeated, Toren will give you a large reward. At this time, if you have completed all other parts of this series of quests, he will also reward you with a unique paraglider fabric for you to use at the Hateno Dye Shop.
From here on out, all prizes will be an easy 100 rupees available each time the Blood Moon rises and the monsters reappear.